Pages

Saturday, October 11, 2014

Our New Interior Lights

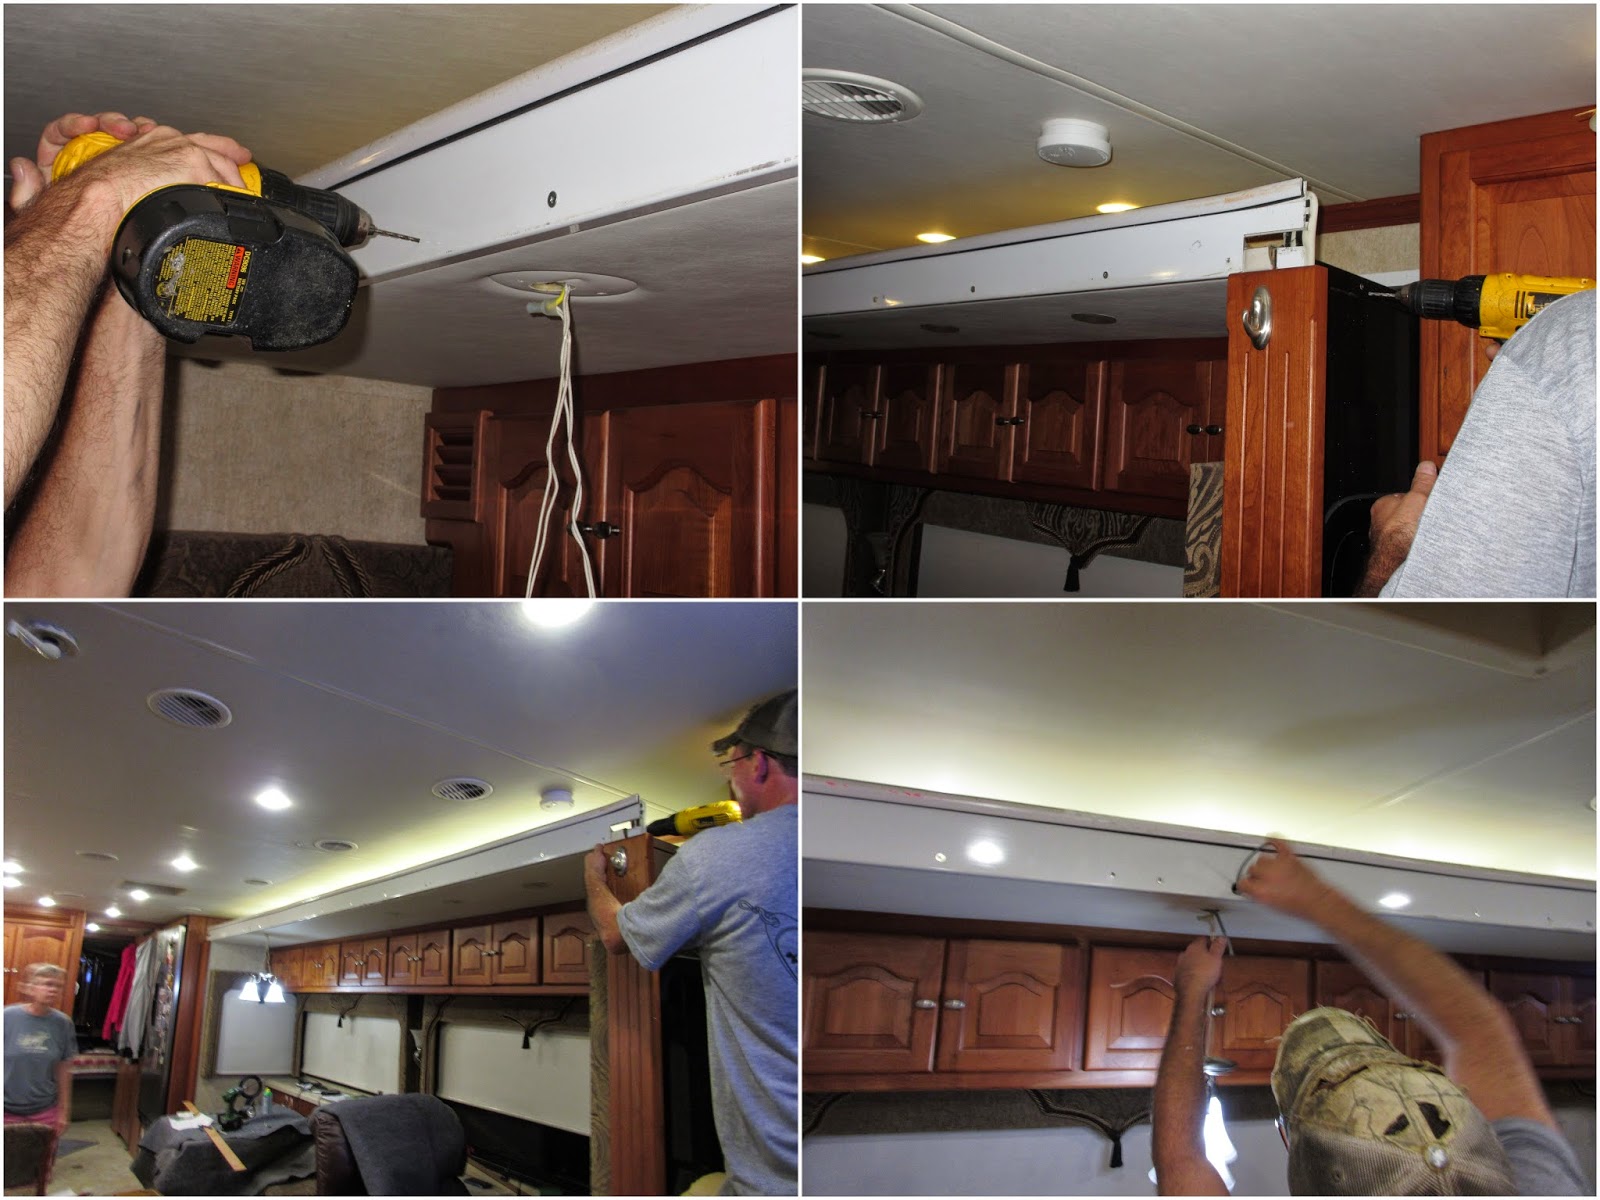
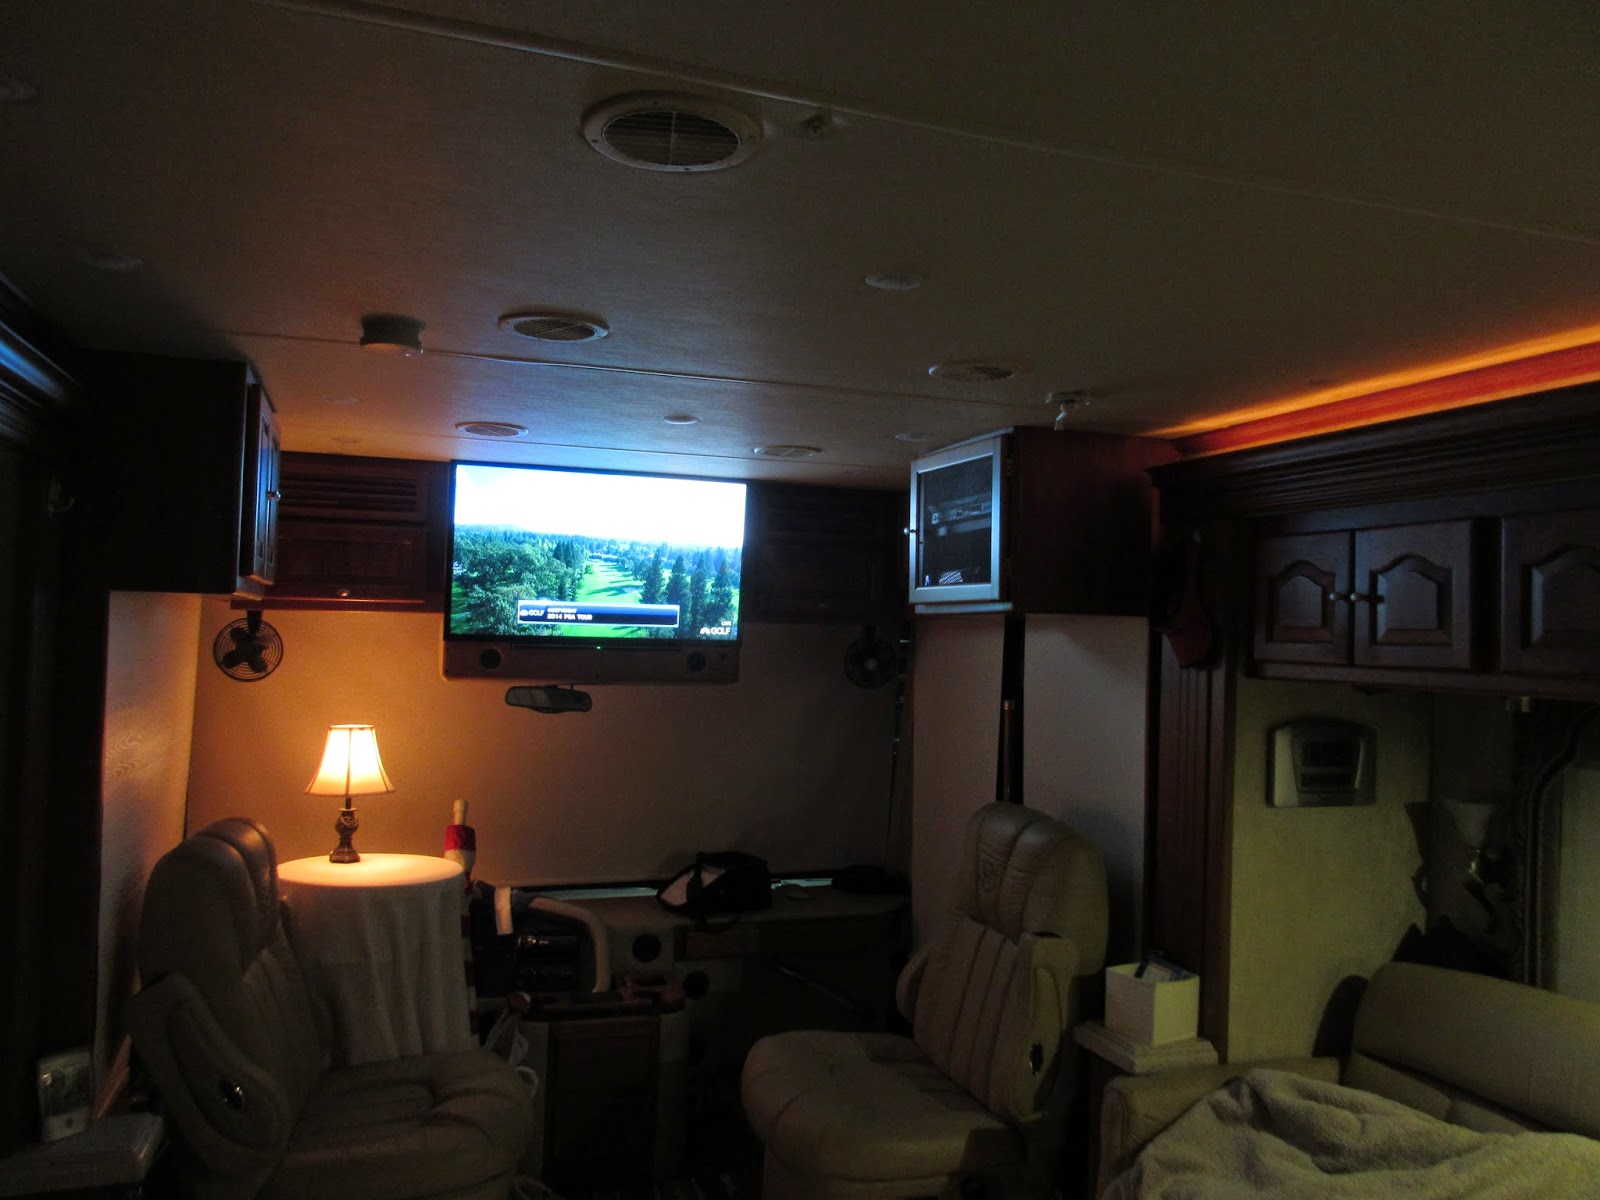
This is a story of a 'work in progress'.  We had new interior lights installed behind the trim near the ceiling on the front slide outs.  They worked fine for two days but now the string on the Driver Side (DS) doesn't work.  Ugh oh...

This was a bit of a struggle from the beginning and eventually we will learn enough about wiring it all together.  But this is one of those projects that didn't quite go as expected.

Here's how it all went down.

We contacted a guy who knew a guy that could install interior rope lights.  That's how we have found after duty work projects guys in the past.  Someone knows someone.  In Red Bay it is very common.

Our guy is a pretty busy and hard working fellow. He finished up another job and came over and we finally got started on the install about 7:25 PM Thursday night.

He used the air system from the Roadrunner for his brad gun.

Then he carefully pried off the bottom molding piece of the DS slideout, beginning in the rear.  That exposed the metal screws holding the larger molding which was secured into the metal slideout frame.
My job was to go back with a pair of needle nose pliers and remove the fine brad 'nail's' that were holding the bottom piece.

Next we removed the middle and front pieces, then laid them face side down on the floor.  We then carefully measured the rope lights to precisely the length we wanted.  There are faint scissor marks on the rope light to show you were to cut.
We then stripped the end section exposing the wires and touched them to a 12v battery to make sure the lights were all working.
The speaker wire then was fed through the front end of the metal hollow tubing/frame down to the light over the table.  After shoving it down through the channel, we fished it through the extra hole we drilled, then down through with the other wires to the existing light.

So far so good.  But this is the hardest part of the whole projects.  We have two lights and two switches on the wall.  We are going to add a third light and switch (rope lights) and have them all work together.  All on, all off, some on some off and every combination.
We let that go for a while and got back to mounting the rope lights onto the back of the trim.  Each piece of the trim was butted up to the next one.  Then the rope lights were tacked into place.
At the end of the rope lights he installed a pig-tail the connected to the battery to check the lights one more time.
 We turned our attention to the other side, took off the trim on the other side.  We installed a light switch near the end of the Passenger Side (PS) sofa.  The rope lights were mounted on the inside of the trim near the first overhead light.
 It was a much easier installation and we put the trim back together and called it a day.
 It was past 11:25 PM.  But we wanted the lights up and only had the wiring left on the DS.
 On Friday we got into the Service Center got all the repairs done on our list and went back to our campsite.  He came over after work and hooked up the lights on the DS.

I wish I had watched more closely on what he hooked up to what.  We checked it out and it all worked fine.  Three lights, three switches and every combination of on/off.
But on Saturday morning, we tried it again and the lights did not work!  Ugh!...  We made the decision to trouble shoot it and maybe re-wire things our selves and keep to our departure schedule on Saturday morning.

We are scratching our heads though after taking the light down over the table and looking at all the connections.  We took off each connector and rewire them all but clearly didn't get it right.  More to follow on this...

I share this in part to document the fact that not all our upgrades go smoothly.  Most do, this one did for one set of lights.  Then too, I believe we will eventually figure it out and be able to show you the new lights on both sides.

That's all for now and THANKS for joining us on the Roadrunner Chronicles!

Wednesday, October 8, 2014

Roadrunner Repairs at Red Bay

We were in Red Bay for less than a week.  We arrived on Monday and left first thing Saturday morning.

There were only a few things on our list but they were important enough to get over here to get them done:

  1. Fix (e.g. repaint) clear coat peeling on the front and back top (the end caps) of the motor home.
  2. Raise sink end of galley counter and drawers so it doesn't make contact with the floor
  3. Re-caulk counter top and back splash on galley after it is raised
  4. See if we can get 1" trim wall paper that matches our year for areas where it meets wall and countertops
  5. Ask best way to fix trim and walls that are faded/worn by waiter and moisture
  6. Replace rivet in corner connect piece trim on outside of Passenger Side (PS) from slide
  7. Check rails to see if any cracking has occurred
  8. Check floors under slide outs and wet bay to make sure they are still solid

And we decided to check how much it would be to install rope lights along the interior up near the ceiling over the front slides outs

First, the repaint job and clear coat for the front and rear caps.  We pulled into Bruce Deaton's Paint and Body Shop and left the Roadrunner there.

They pulled it into a bay and started taping it off.  Next they sanded down the areas were the Clear Coat was peeling.

We didn't want to let this go as it has a way of getting away from you and the next thing you know we'd have peeling down the front and back of the motor home.  Didn't want that.  Plus, it's easier to catch it early and get it fixed.  That way we don't have a lot of high $$ at once.

Then they sprayed it, let it dry and we picked it up shortly after 2PM.
We were very happy with the result.
No more peeling on the cap ends on top.  If you look closely, you can see Pam washing the car.  You may be wondering, "Why is she doing that and not you?"  Great question.  If I did not get on this blog and stay with it, it may not get posted today.   After this, I'll be on top of the roof again giving it a well needed wax.

1 - So our first item got checked off - Fixed the peeling paint.

We had to wait a couple of days before they called us into Express Bay #8.  We got the call just before 11:00 and were there waiting for them after they returned from supper.

Next, "lifting the sink side of the galley" in the PS slideout.
Pam removed everything from under the sink.  Then they unscrewed two side panels on the right side of the cupboard under the sink.
Next, they got a block of wood and a crowbar and slide it under the whole unit raising it up about 3/4".  
That was enough to place a 3" piece of trim under the supporting structure (right where the tip of the arrow is in the above photo).  
2 - Whey the crow bar was removed that small shim raised the galley about 1/4" off the ground.  Mission accomplished.

We could have re-caulked the counter top ourselves but since they had the materials right there, we asked them to.
3 - That took about 2 seconds and it was done.

On to the wallpaper next and the tech went to see if he could find a 1" four foot piece.  I figured that would be a good way to patch and repair some of the places where it is curling up and getting squeezed by the constant movement of the counters and walls as we roll down the road.
He didn't know if they would have the same wall paper in stock as some of the more recent models have already run out...
5 - But he did it and now I have a roll to use when that project gets scheduled. Scratch another one off the list.

I really didn't want them to refinish the trim or walls where the moisture has affected the stain in the bathroom and sink area.  I just wanted to get their take on how to do it myself.  Not surprisingly, they said lightly sand, match it with a light cherry stain and get a clear spray finish on top.
6 - Done.

For some reason the pop rivet at the corner of the PS slide out was coming loose so I asked them to remove and replace.  It took some doing when they tried to drill it out and 'buggered it up' to use his words.  No problem.  Just use a larger rivet.
If you look real close, you can see that the rivet is not painted to match the rest of it.  But who looks that close?

While that was going on another tech climbed on the roof and check our rails for cracks.  Looked good, no need to replace.  He also checked the wet bay and the floor under each slide out.  Those were good too.

7 - 8 The list was completed.

We did get some rope lights which I will show in another post.

Although we spent less that a week at Red Bay, we were glad we did.  We got a lot done and we met some new friends.  And we took a tour of the plant again (future post) and saw some of the changes around town in the campground (another post).

Thanks for joining us today on the Roadrunner Chronicles!  Until next time...

Friday, October 3, 2014

Roadrunner Financials - September 2014

Roadrunner Recap
During the month of July, we were in the following locations:
  • Camp Meade RV Campground - Fort Meade, MD
  • Beacon Hill Camping - Intercourse, PA
  • Assateague State Park - Berlin, MD
  • Kiptopeke State Park - Cape Charles, VA
We spent time in the DC/Fort Meade area primarily to be near Adam and Melissa who live in Chevy Chase, MD.  They are about 45 minutes from Fort Meade, but there are not a lot of options closer to them.  Next, we traveled to Amish Country in Lancaster County to see friends Mike and Sue in New Holland, PA.  On our way down the Eastern Shore, we stopped a for a few days at both Assateague State Park and Kiptopeke State Park where we ended up staying through the Labor Day Weekend to wrap up the month of August.

Good News Areas We Are Under Budget
We had a good month in the following areas:

  • Diesel fuel
  • RV maintenance
  • Campground fees and 
  • 1 Time costs

Biggest Expenses
I paid our semi-annual insurance payment which caused a spike.  Other areas were

  • Groceries and
  • Misc (good fitting hiking boots)

Large One Time Cost Item
Our large one-time cost item for the month was our Medical/colonoscopies.  Results were good but as you know, they are not the most fun thing in the world.  Necessary evil.

Monthly Average

That's a snapshot of how we're feeling about the cost of things on this Full-Time Journey.  We are in month 63 of doing it.

Hopefully, some of the thoughts and figures are of some interest/value/curiosity.  If you'd like a blank spreadsheet of what I use I'd be glad to send you it at no charge to do with what you wish.  

Thanks for joining us today on the Roadrunner Chronicles!

Thursday, October 2, 2014

Another Tour of the Tiffin Factory

We love going to Red Bay and taking the Tiffin Motorhome factory tour.  We learn something every time we do it.

It begins daily at 9:30 AM.  We were getting the Roadrunner painted (cap ends only) at Bruce Deaton's which was near the Visitor's Center where the tours start so it was convenient.  We got there a few minutes early after grabbing some breakfast at Jack's.

We got to the Visitor Center a little early.  It is starting to be the busy season at for visitors because many stop off at the factory en route to their winter stay in Florida.
We had a good size group and had four tour guides.  Only two traded off the duties in our tour and the other two were there just in case they had too many at the start for one group.

The tour guides happen to be retired Red Bay school teachers.  They were very well versed in the history of the company and details at each stop along the way.
The first building we went into was the cabinet shop.  They cut and plane the wood here.
Then they make just about everything you can imagine.  Below we looked at ceiling trim that was cut out from a larger piece of wood that had been glued together.

As woodworkers of sorts, Pam and I find this fascinating!
We could watch this work for hours!  I like the heavy duty HVAC set up they have to do away with the dust and fumes.

The noise however, is another thing.  Very noisy in there and everyone I saw had on ear protection.

Everytime I take the tour I have a few questions.  It is hard to absorb all the work stations and what they do in all the buildings.  Today I wanted to learn exactly how they put the whole kitchen unit into place inside the motor home.  How they build the doors, put together the cupboards etc.
I asked one of the guides where they actually did this and he pointed out the first place on the tour where he saw a couple of kitchen units getting worked on.  This seems to me as one of the more delicate pieces to build because it covers such a large area of the inside of the motor home.  Lots of angles and moving parts to get squared up and plum.


Another mystery to me is building the chassis.  We have seen the building in earlier tours where they build the Tiffin Powerglide chassis.  I guess it is not anymore complicated than other areas of the motor home but it sure seems to me like it is.
It is football season and I saw more than one SEC footballs poster around the plant keeping track of who Alabama played and how they did.

From that side of the yard, we went over to the main production line and saw them take the bare chassis through the different stations.  The first area is over where they make the walls and roof from installed materials.
Heavy duty manufacturing with the computer run machinery going on here.  

We wandered through up and down all the lines and watched them cut holes in the flooring for pipes and connections, move and install the side walls and roof. 
It was another interesting time on the factory tour and I look forward to doing it again.

Thanks for joining us today on the Roadrunner Chronicles.

Monday, September 29, 2014

Projects at Mike and Joan's

We left Maynardville, TN on Monday after almost a week there.  It was an easy drive to Red Bay, AL with good roads and average traffic the whole way.
We had plenty to do at Mike and Joan's and spent a couple of days working of some projects around the house.

First was replacing the front door.
Things moved along fine with the first part of it.  We removed the door, and then the frame and trim around it.
The new door went in fairly easy.
The bump in the road happened with the fancy door handle and dead bolt.
The dead bolt went in pretty quickly.  The door handle under it did not.  It was a real head scratcher.  We didn't realize the there is a universal mechanism inside to pull and turn to make a right hand latch into a left hand latch.  Once we got some instruction back at Lowe's showing us that, we went back and finished installing the handle.  It took probably an hour to line every thing up and get the thing secured.

Next, we worked on the bedroom.  First, we pulled old carpet up and removed the carpet tack and form padding.
Then the ceiling was painted, and we tackled the walls.  Pam took down the old border wall paper.
And we started putting the new laminate flooring down.
It took the better part of two days, but the floor got finished after a quite a few breaks...
It turned out well and then we moved all the furniture back into the bedroom.
Besides doing something productive, I think we like helping out and learning things.  Some things I learned:

  • Installing doors. There is more than one way to install a door.  In this case, we removed the door from the frame,  plumbed it and then secured it. Other times I have installed doors with the door left in the frame.
  • Door handles.  We knew about right hand and left hand doors when we bought the door at Lowe's.  We were surprised by the door handle latch that was for right hand doors.  We learned door handles have a universal piece you pull out and twist to make the latch point the other way.
  • Laminate flooring.  I don't know if I have ever installed it but it is very easy.  Especially with the foam, sliding floor backing on each piece.  Once you get a system down, it goes fairly fast.  As long as your knees and back holds out...
That was the crux of our projects at Mike and Joan's.  It was fun, we learned some more things and were happy with the results.

Thanks for joining us today on the Roadrunner Chronicles!