It took us a couple or three years to finally get it done, but we are very happy with the result.
First, Pam and I taped together some cardboard to make a template of the area we thought we wanted to cut out of wood.
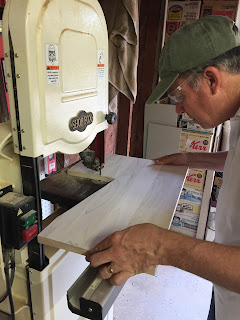
We liked the size and the way it fit, and Kirk went to work in his woodshop using some poplar wood he had in his garage. It was a little bit of an 'L' shape so he glued a piece together using wood glue and a biscuit joiner.
We liked how the rough cut fit and gave ourselves a little distance on the left half in front of the dials below the radio so we had room to operate them. For the corners, we used the curve of a plastic cup.Next, Kirk added 1/2 inch of trim along the edges around the whole top.
After he cut all the pieces like he wanted, he glued them down and used a few brad nails to secure it.
Next he cut down the excess and sanded and sanded the sides. We both took turns on that until it all looked like the trim was right on the edge.
We wanted to cut a 'test case' before we did it on the new table top. He used a scrap piece to make sure it was going to work.
The test case was developed from my first iPad holder prototype and we proceeded. We cut two pieces that fit snuggly into the cupholders. Then we carefully drilled two holes for screws and inserted a two female-threaded screw receptacles. (Forgot what the technical name for the piece is...)
The iPad holder was also screwed and secured with a bolt into the underside of the console. None of the screws or the bolt touched any wood. There was no scratching or contact of metal and wood except for the drilled holes.
Then we carefully measured where the screws were going to go in the top of the console. We had to precisely drill the holes over the female inserts. The screws on top were 'counter sinked'. When the screws were tightened, the bottom piece in the cup holder drew up against the cupholders on the underside. On top, the console was tight and secure. No movement at all.The moment of truth came when I slowly screwed down the four screws. All went into the threaded receptacle pieces easily and screwed down just below the top of the console so there was no unevenness.
We were pretty excited about using it after we left Oklahoma City for Palo Duro Canyon near Texas.
I had an iPad holder which worked well and we had a space that was 100% more useful than the previous cupholders. Instead of a balancing act when we had lunch as we traveled down the road, this new surface made it easy.
Once we got to Albuquerque, we had a couple of trial and errors on the right tint and color to match the color of the other woodwork in the Roadrunner.
Pam tired a couple of different stains before we declared victory and went with something that was not exact but close.
Next, Pam got some rubber/foam matted shelving cover for the console top so things would not slide around.
It was a one piece deal, so I had to sequence it all together and tighten down the four screws underneath the pad.
The final result:
We've had it now for a few weeks and really love it. We couldn't be happier with how it turned out.
If for some reason, we decide we don't want the iPad holder any more, we can remove that and cut out a new black pad and you couldn't even tell there was one there.
Or, if we decide we want to go back to just the cupholders, we can remove the entire console unit and there are no scratches or screw holes to be seen.
But I think we will use this for a long time...
Thanks for joining us today on the Roadrunner Chronicles!


